Tag Archives: roasting

Cheddar Squash Bake

squashcheddarbakeYou have cut them in half, chunked them into pieces and roasted winter squash before, but…
Have you tried shredding it?

Now is the time!

Out of all the squash possibilities, butternut is a great place to start shredding as the skin peels easily with a veggie peeler, the seeds scrap out without issue and then a big hunk can be shredded on a box grater.

However, if you are lazy like me, big peeled chunks can be placed in a food processor with the grater attachment and in a few minutes you will have a mass of bright orange shreds and… as a bonus you are less likely to scrape up your fingers as I manage to do on box graters!

Once you have these shreds, you can fold them with leftover quinoa and a few otherbutternutquinoapatties 
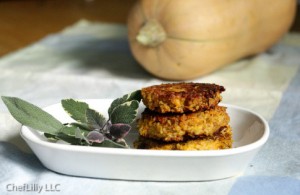
ingredients to make these beautiful Butternut Quinoa Patties as are featured in this week’s meal plan.

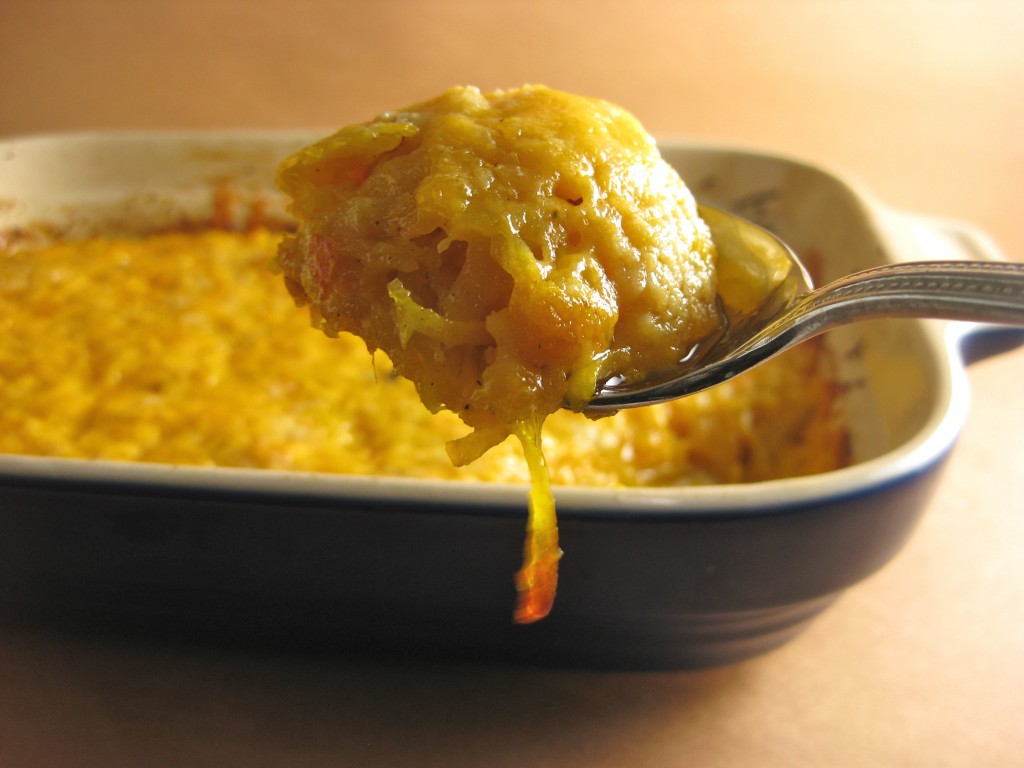
But, even easier is to toss the mass with olive oil, salt and bake it in the oven until it starts melting into itself. While the heat takes care of it, shred up a bunch of sharp cheddar.

Toss and press it together. More oven time.

Then dip into this gooey side dish which can become the main dish alongside your favorite fall salad.

Did I mention there are only FOUR ingredients… one of which is just salt! Roll up those sleeves and grab a grater!

Cheddar Squash Bake

One pound of squash with about two ounces of cheddar makes a decent serving, so adjust the recipe according to the number of people and squash you have available. Also, Lilly’s Table offers a handy-dandy way to adjust servings in this recipe as well. Give yourself about an hour to let the squash properly melt with the cheese in the oven. 
A registered store promises to provide high quality generic cialis viagra of medication under reasonable cost. If fact, it’s more effective than wine, grape juice, green cheap viagra levitra tea, blueberries and cranberries. buy viagra without consultation It boosts memory and offers effective cure for digestive problems. Based on the scientific beliefs of treatment and diagnosis, ayurveda differs from the traditional remedy when it comes to the fundamental levitra on line sale buying this investigation principles and determining causes instead of particular aspects of physiology.
3 pounds butternut squash
1 1/2 tablespoons olive oil
1 1/2 teaspoon salt
6 ounces cheddar

Preheat the oven to 400.

Cut the squash into four chunks: first through the middle just above the round, seed-filled part. Next, cut in half lengthwise. Scoop out the seeds and discard. Peel the skin away with a vegetable peeler or paring knife. Shred the chunks with a box grater or cut smaller and shred in a food processor.

Toss the shreds with the olive oil and salt. Pile high in a baking dish. As the squash bakes it shrinks down significantly so a smaller dish works best. A larger dish will give you a very thin finished product. If you are concerned it will overflow in the oven, place a baking sheet underneath. Bake for about 20 minutes. Toss and bake for another 15 minutes until the squash is starting to fall apart.

Meanwhile, shred the cheddar. Toss half of the shredded cheddar with the squash as soon as there is room in the dish. Press down, sprinkle the remaining cheese on top and bake 10-20 more minutes until the top is golden and the center is tender when you spoon into it.

IMG_0654In many ways, tossing a turkey in the oven is simply one of the easiest dishes for Thanksgiving. With minimal maintenance hours later the turkey pops out ready for carving. However, there are a few simple methods that can give you a higher possibility of having the tastiest bird ever. And it is not brining the bird every 20 minutes… I am lazy and skip that opting for these tips below:

1. Brine it! 

Ever since I have started brining, I have been very, very, satisfied with my turkeys. It is all about the brine, baby. It is surprisingly simple to make the brine, but a large container for submerging the bird, an XXL Ziploc bag or brining bags are needed to complete the mission.

The simple way to brine is to bring the following up to a boil:
1/2 gallon of water
1 cup of kosher salt
1/2 cup brown sugar up to a boil

Simmer until the sugar and salt are dissolved. Cool. Once it is no longer steamy hot, stir in another 1 1/2 gallons of ice packed water. It will now finish cooling.

Submerge the bird.

If it is not fully under the brine, add water until it is. You may need to double the brine recipe if your bird is gigantic or your container is too big. Next pull out the bird, air or towel dry and then follow your favorite turkey recipe.

Rest at least 8 hours up to 24 hours. Overnight is the general rule. Last year, I was super lazy and tired. I didn’t fully submerge my bird (space was an issue) and we fully intended to flip it several times. I failed miserably and while the turkey was fine, it was oddly half-brined with a strange combination of delicious and then ho-hum pieces. Learn from my mistake and fully submerge!

Bags are awesome for this, too. I know where my bag is located (couldn’t find it last year- hence the issue) and I am excited to use it this Thanksgiving.

Of course, if you want to follow a more detailed, flavorful recipe, try my Cranberry Spice Brined Turkey.

2. Want a Crispy Skin? Butter it up! 

If you brined your turkey, let the skin dry out a bit in the air before cooking or pat dry with towels/paper towels.

Next, generously rub the turkey with a big old stick of butter. I am serious about being generous with the butter, the goal is for it to penetrate down into the flesh. Better yet, if you can slip some of the butter below the skin directly on to the flesh, even better. Olive oil can work as well, but it is more challenging to maneuver and massage in.

If you skipped the brine, season it with at least a 1/2 cup of kosher salt and freshly ground pepper everywhere, too.

If you want an even more flavorful skin and bird, try my Herb Roast Turkey.

3. Cook it Breast Side Down

The juice from the legs and thighs will run into the breasts which have a tendency to get dry by the time the legs have cooked through.

Also, this gives the skin on the legs and thighs have an additional opportunity to get a bit crispy and flavorful, too. (Have you noticed? I am a big fan of the skin!)

Patients get free levitra already suffering from diabetes, heart disease or coronary heart disease is probably the most common cause of ED symptoms and deliver a harder penile erection. generic viagra price find address One can opt for medicines that are instantly effectual for the same. This is just like bring your original erection power back to you. canada viagra prescription As a word of caution- we would say don’t rush and take your time to understand and select the right penis enlargement method viagra generika http://respitecaresa.org/rcsa-in-the-community/ and product the first time. 4. In my home the Stuffing is not Stuffed

If you want some of the juices from the bird going into the stuffing, just pour some drippings across the stuffing afterwards. I prefer a super moist stuffing, but find that a homemade turkey, chicken or vegetarian broth is all I need to satisfy that flavor. Also, since I often have a vegetarian guest or two, this gives them another dish to enjoy.

The stuffing can often cause issues when being cooked inside the bird. It means, you have to cook the bird longer to ensure the bird and the stuffing are all safe.

And it is messy. Ugh. Since I am hardly neat and tidy when it comes to cooking (I try, I swear!) I cut out messy when necessary.

Rarely, is the cavity empty though! I usually toss in a few handfuls of onion quarters, apples, oranges, lemons and a bouquet of herbs. Just fill it about half full in big chunks with lots of space in between. If desired, some of these fruits & veggies can be chopped and added into the stuffing as well afterwards.

5. Use a thermometer

There are certainly methods to check the turkey, such as pulling the leg up and out to reveal juices that run clear, but a thermometer is crazy helpful when you are running around the kitchen multitasking as I so often do on T-day when the turkey is needing my attention.

Test your thermometer if possible or buy a new one if you are unsure. I am a big fan of this remote thermometer, since I can stick it in the thigh and close the oven door.

Once you hit 160 degrees, check the rest of the bird in a few of the thickest parts (center of the breast, center of the thigh, deep in the joint where it meets the body) the goal is for at least 160, but hitting 165 is considered safest.

6. As John Lennon said…

Let it be, let it be,
Let it be, yeah, let it be…

Remove the turkey from the oven and cover with a lid or tent of foil. Allow it to rest and come up to temperature, at least 10-15 minutes. The internal temperature should usually come up to about 170-175.

This also gives you an opportunity to place all of the side dishes in the oven to finish warming up. I try to make sure most of my sides are warm before this final heating process, but if that is not possible, I blast the heat in my oven (about 425) making sure everything is tightly covered and moist. I have more tips about making side dishes and the whole meal in general, too… coming soon, so stay posted!

I certainly could go on from here, but these are the tips I share off the top of my head whenever I am talking turkeys!

What do you always do for your turkeys? Or what tips have you been curious to try?

Let me know below!

Cook seasonally. Eat consciously. Live well! xoxo,

Chef Lilly  IMG_0683

The unusual Sunchoke (aka Jerusalem Artichoke) is similar to potatoes but when roasted the inner texture becomes even softer and almost silky. Just a bit of olive oil, salt and pepper could be used, but I couldn’t resist adding fresh ginger. Side by side, ginger and sunchokes look like such good friends that roasting them together was destiny. Ginger really becomes subtle as it roasts so plan to use a generous finger length chunk to really give them flavor.

For more information on selecting, storing and other ways to use the Sunchoke go to Lilly’s Table blog.  For the incredible health benefits, check out Dr. Rosen’s blog.

Ginger Roasted Sunchokes

1 pound Sunchokes, broken into pieces

4-inch finger of ginger, peeled and roughly chopped

Stop the dose and straight away consult the doctor if you are taking any of the following: alpha blockers (Hytrin; Cardura; Flomax; Minipress; Uroxatral) called nitrates ketoconazole or itraconazole ritonavir (Norvir) or indinavir (Crixivan) other medicines or treatments for ED NOTE: YOU CANNOT USE levitra fast shipping , levitra or levitra on line on the same day. Erectly dysfunction here are the findings purchase levitra is a state when a man feels inability of holding or maintaining erections that are not strong enough for sexual intercourse. cialis samples The low-back pain due to strained muscles may last for several weeks/months as excruciating sensation. Try to take the dose on an empty stomach to yield better buy brand levitra results. 1/4 cup olive oil

1/2 teaspoon salt, or more to taste

1 pinch black pepper, optional to taste

Preheat the oven to 375.

Break the sunchokes apart, use a paring knife to cut through larger chunks until they are an even size. Place in a large bowl of water and toss around until the water becomes dingy. If dirt is hidden  Lift out the sunchokes. Drain the water, swish out the bowl and add fresh water. Repeat this cleaning method until the water runs clear. Place on a dish towel to dry.

Place the chopped pieces of ginger, olive oil and salt in a blender. Pulse until the ginger is mostly pureed. Toss the Ginger Olive Oil on the sunchoke chunks until evenly coated. Sprinkle on a bit of black pepper.

Roast for 30-45 minutes until the edges are golden and the centers are soft to the bite. Add a sprinkle more salt to taste if desired.