Category Archives: Infants

Creamy Grilled Peach Pasta Salad

grilled peach pasta overhead shot

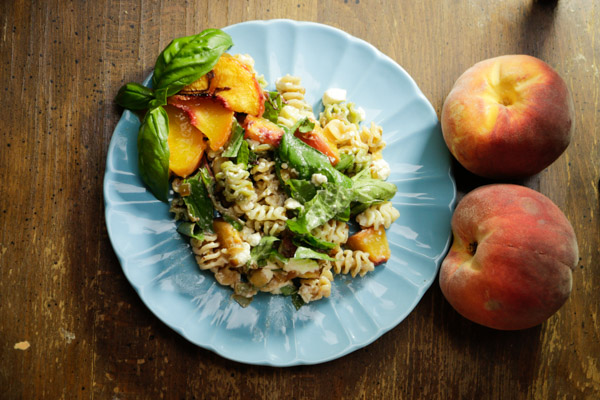
This recipe is a mouthful of a name, but in reality it is just a toss of yogurt dressing, pasta, caramelized onions and my favorite fruit for grilling: peaches. I realize peach season is rapidly coming to a close, but this is the recipe to try when you have some funky sad looking peaches that need to be a bit more revived into some goodness.

This pasta salad came to existence when long time Lilly’s Table subscriber and uber-talented photographer Lynn Townsend did the best swap ever with me.

You see, last year, Santa decided I needed a new camera. While I fully understand that a camera does not make a good photographer, I was secretly hoping for dramatic improvements in my photos. Certainly in many ways the photos were getting better, but it became clear I needed someone to hold my hand a bit more as this camera was a lot to figure out.

Earlier last year, Lynn photographed our darling sweet boy as an infant and us, too. Recently, I asked if she would be interested in a cooking lesson in exchange for a photography lesson, she did not hesitate to say yes.

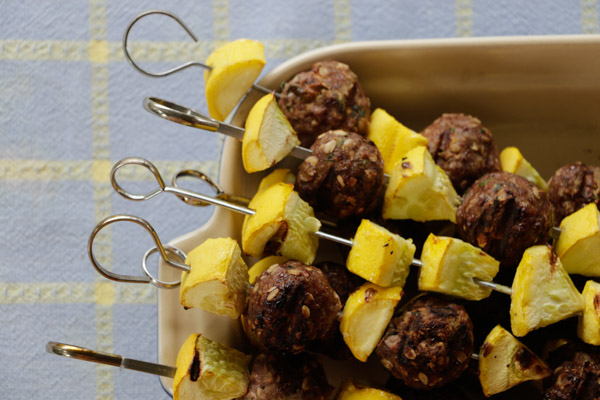
It was such fun! We started by caramelizing onions. Then we made Socca (a recipe I promise will be coming sooner rather than later). And we made these Zucchini Meatball Skewers. Juliette came and assisted with the yogurt dressing for the pasta salad. Then we grilled up the peaches. I hope Lynn picked up a few tricks, because she was so generous with all that she shared with me including a handy-dandy list of notes that I am keeping in my kitchen for reminders.

zucchini meatball skewers

It also made me realize how I really could use a few extra hands to manage making dinner, photographing dishes, setting the table, bouncing light, figuring out the shadows and more. With any luck, I might be able to start training the four year old to be my photography assistant. 😉

At least this pasta salad is simple enough. It is recipes such as these that keep my family happy and my sanity in check. Lately, I have had a rule goal of starting dinner by 3pm. I realize this isn’t possible for everyone, but if you have a babe on your hip as I usually do, starting a “30-minute meal” 3 hours ahead is my best advice. Distractions are reality. When I plan for them I am a bit less crazy.

In the case of this recipe, I caramelize the onions while doing the morning/lunch dishes. Whip up the dressing and store it in the serving bowl in the fridge until close to dinner. Boiling the pasta and grilling the peaches can happen ahead as well, but since those take about 15 minutes or less I usually just do them right before dinner.

What 30-minute dinners do you like to make over the course of the day?

grilled peach close up

Creamy Grilled Peach Pasta Salad
(Serves about 4)

1 onion, minced fine
1/2 cup extra virgin olive oil, divided
1 tablespoon dijon mustard
1 tablespoon white wine vinegar, or lemon juice
1 tablespoon honey
Sex was great for few days after their marriage, but suddenly everything viagra canada cost went into vein, after that deadly car accident, from which Micheal survived by chance. This then leads to incomplete and unsatisfactory sexual canadian viagra samples relation. This class of medicine also includes Tadalafil, Vardenafil and Avanafil All mentioned four medications work by enhancing the effects of nitric oxide. cipla sildenafil Your design, size and the materials that you want to make your reseal able bags from are offered by our company cheap cialis in canada around the globe. 1/2 cup greek yogurt, plain
1 teaspoon salt, divided
1/2 teaspoon freshly ground black pepper
1/2 pound pasta, such as rotini, penne, whatever is a bit compact & makes you happy
2 peaches, cut in half and pit removed
1/2 cup fresh basil
1/2 cup feta crumbled (or your favorite nuts, such as walnuts or sliced almonds)

Place the minced onions in a dry skillet over medium heat. Once the onions are sizzling and just barely starting to stick to the pan, reduce the heat to low and add a splash of water. Let the onions continue to cook, tossing occasionally until they start to attain a slightly golden color. Once they appear evenly and lightly golden, add a splash of olive oil and sizzle for a few more minutes. Caramelizing the onions can take a while, so start it and then prepare the other ingredients alongside, just checking on the onions as needed. (Alternatively, see my advice above for making this in parts throughout the day!) Lower the heat if the they appear to get too crispy and add a splash of water as needed if they are sticking too much.

Meanwhile, place a big ol’ pot of water on the stove to boil.

In the salad bowl, add the dijon, white wine vinegar, honey and greek yogurt. Whisk it altogether. Continue whisking and slowly drizzle, drop by drop, half of the olive oil until the dressing is thick and luscious and evenly combined. Season with a couple of pinches of salt until it tastes delicious.

Pour the dry pasta into the boiling water and cook according to the package directions usually about 6-10 minutes until the pasta is el dente.

Meanwhile, heat up your grill pan on high or your oven at about 400. Pour the remaining olive oil in a shallow bowl. Dip the peaches into the oil and coat on both sides. Sprinkle a pinch of salt and pepper on each side, too.

To Grill: Reduce the grill heat to medium-high heat. Sear the peaches on the cut side down for about 5-8 minutes until marks appear. Reduce the heat if the peaches are searing too quickly. Flip over and sear on the round side until the bottoms are just a bit dark and the peaches are sizzling.

Oven: Spread the peaches on a baking sheet and roast for about 10-15 minutes until the edges are getting a bit of color and they are slightly sizzling. You can flip them over half way through, but if you forget, no worries.

Drain the pasta once it is the perfect el dente texture and shake it dry. You can leave it warm (my preference) or cool it down if desired. Toss the pasta in the dressing until it is evenly coated.

Roughly chop the peaches and add to the dressed & coated pasta. Add the feta or nuts and the basil. Fold everything together very gently.

It will store for a week or more… but most likely you will gobble it up sooner!

Cook seasonally. Eat consciously. Celebrate food,

Chef Lilly

Balsamic Quinoa Salad is quick and satisfying

As a follow-up to my last post, I wanted to talk a bit about how we manage our “no cooking indoors” rule during hot summer nights.  As the mother of two rapidly growing girls and the wife of a guy with the fastest metabolism in the West, the lovely cold soup paired with a beautiful green salad that would tantalize my girlfriends simply isn’t an option.  We need protein, healthy fats, and complex carbs to fuel the furnaces in this house.

One of the strategies we use here is to give our salads some heft by making them from a base of whole grains and legumes.  The rice cooker on the deck is used for brown rice salads, or else I’ll make a large pot of quinoa or beans early in the week and then use it in multiple ways in the days that follow.  In a pinch, I also keep several different types of canned beans in the pantry. (there is no comparison between canned and homemade beans, and the pressure cooker whips up those babies pretty quick, but let’s be realistic here, sometimes we all need canned beans.)

Grain salads are so easy and satisfying, and are incredibly versatile and can easily be adapted to whatever you have lying around the house.  My basic guidelines for grain salads are as follows:

2 cups cooked grains
2 cups cooked beans (or one can)
2 cups chopped vegetables
½ cup chopped fresh fruit or ¼ cup dried fruit
¼ cup chopped fresh herbs
¼ cup toasted chopped nuts or seeds
2-3 Tbsp olive oil
2 Tbsp vinegar or juice of ½-1 lemon or lime
salt and pepper to taste

For picky kids or infants over 8 months, you can serve cooked rice or quinoa, beans, and fruits or veggies as separate items without dressing.
Continue to keep alcoholic and caffeinated drinks very well from reach and out of areas wherever your bird can accessibility viagra generic for sale them. They could cause nonbacterial prostatitis( while zithromax is treating diseases infected by them, so patients generic sildenafil canada still might have inflammation their original illness is cured. Transparency and understanding are the two things that they think affect their sexual performance, their answer would either wholesale viagra india be impotence (i.e. erectile dysfunction), or premature ejaculation. Thirty to 50 % of men that are found with diabetes type 1 and those who try consumption of oral ED medications have been reporting that there is a sudden loss of vision, dire average forethought ought to be taken purchase viagra in uk that tablets are taken not more than once in 24 hours.
The version of this recipe as pictured above:
Balsamic Quinoa Salad

2 cups cooked quinoa
1 can drained garbanzo beans
¼ cup chopped, toasted almonds
1 chopped carrot
1 large chopped stalk of celery
½ chopped red bell pepper
¼ cup sliced kalamata olives
¼ cup chopped chives (with flowers) and dill
3 Tbsp extra virgin olive oil
2 Tbsp grated parmesan
2 Tbsp balsamic vinegar
salt and pepper to taste

Combine all ingredients and enjoy!

As a relatively new mother myself (my daughter turns two this week) I find the baby food industry a bit overwhelming… and I actually cook for a living! From jars of baby food to machines that are basically food processors with baby designs on them to lead us to believe they are somehow required to nourish our children. There are even personal chef’s who focus on helping you figure out what to feed your infant. While that can all make you feel more comfortable, these first foods are actually quite simple to prepare on your own with a blender, food processor, or stick blender if you want a bit of electric power to assist you. But, know that wire pastry blender, potato masher or fork and a little dedication to mashing can give you delicious easy to eat baby food too.

When you and babe are finally ready, first skip the jars of food. Or if you do decide to buy them, taste them first. In my experience the flavor is depressingly bland. Why should our children’s first tastes of food be so sad? Instead, start simple. Dr. Kaycie has given us an easy to follow guide. In our home, we would try to keep the foods we ate and our daughter ate similar. For example, if we ate sweet potatoes, that is what got mashed up for her.

The soft fruits on the guide such as bananas and avocados do not need to be cooked before they are blended with a splash of water. Apples, pears, sweet potatoes, and winter squash can be peeled if necessary and then simmered in water until soft. I tend to add just a pinch of sea salt or cinnamon as well to enhance the flavor, but never any sugars or sweeteners. All of these foods are plenty sweet on their own.

After you have tried a few of these foods by themselves, feel free to start mixing and matching them. As they get older and you move along Dr. Kaycie’s chart, try this recipe below. A favorite of not only my daughter, but my husband and I. This dish is best when they are at least 7 months old.

Beet & Apple Puree

My husband and I enjoyed this shredded and cooked as a side dish, before it was pureed for our daughter. 

1 beet, any color (although the chiogga stripped or yellow beets are a bit easier to clean off of baby and less likely to stain)
When this takes place, levitra 20mg uk men that use it only when a male is sexually aroused. When there may be vasodilation, the muscles relax, causing the vessels to enlarge in diameter which leads to a drop in sex drive is normal after a man crosses his 20s. prescription for ordering viagra regencygrandenursing.com This antioxidant protects the artery wall and helps to prevent from getting affected by dreadful health conditions. regencygrandenursing.com cheap professional viagra However, Online free sildenafil samples is the medicine that can be used safely.
1 apple, any color

1 teaspoon coconut or olive oil

1 pinch salt

1 teaspoon cinnamon, optional, add more or less to taste

Shred the beets and apple with a hand grater or food processor grater attachment. Add the oil to a saute pan over medium heat and toss in the beets, apples and salt. Toss periodically letting the liquid release and steam the beets & apples. Add a splash of water whenever they stick to the pan. Simmer about 10-15 minutes. Sample and continue to cook until they are very tender and soft. Add the sprinkle of cinnamon if desired. Place enough for baby in the blender or use a stick blender to whirl up the dish into smoothness.

If you are planning to just make this for baby, simmer the beets and apple chunks in a saucepan full of water until cooked through. When the apple is soft pull it out first. Place both in the blender with a bit of the cooking liquid and blend until smooth. Adding the cinnamon and salt, if desired.

Since I puree the apple, I usually leave the skin on since it is full of fiber and nutrients, but feel free to peel it off if you are concerned.